Welcome to UnderSouthWestSkies — an astronomy and astrophotography blog helping beginners and enthusiasts explore the night sky. Here you’ll find things like practical guides, deep sky observing notes, astrophotography workflows, and monthly sky events tailored for UK observers. Learning to capture your first long exposure image or planning your next night under the stars, this blog offers clear, accessible advice to support you on your learning journey into the cosmos. Drop me a comment Steve
Home page: welcome - who am I - blog aims - blog navigation tips
How I have been using Sequator thus far in my
astrophotography learning journey
Around two years in now to learning, from scratch, i.e. no
knowledge base whatsoever, how to
·Use my DSLR in manual mode
·Do some basic astronomy using a beginner’s
telescope
·Complete some basic astrophotography – both deep
space targets and milky way landscapes
One of the free software programs I got to grips with early
on was Sequator – mainly for stacking my very limited milky way landscape images.
Below I outline my Sequator work flow.
Remember, this blog is written by a complete beginner to
astronomy and astrophotography – for other complete beginners! Essentially it
is a record of my learning journey in these fields. Mistakes, warts and all!
I am doing this post on Sequator today because some one
emailed me and asked if I had any basic workflow notes for a complete beginner.
They had been looking at my ‘Beginner’s guide to taking your first milky way
photograph’ series; in one blog post I mentioned my using Sequator but didn’t expand
on it. Luke, this post is for you buddy.
Firstly, lets start with – What is Sequator?
It is a free, at the moment, software for windows platforms.
It stacks and aligns RAW or TIFF file night sky images, and in doing so removes
random noise. An added advantage? It handles images with a little bit of
foreground in them. All the better then! And, bonus, it will help with other
challenges such as light pollution, distortion, hot pixels, etc. I found the
basic functions quick and easy to learn, understand and set up ad I have put my
workflow notes on sequator further down this post. Remember, I am a very new
beginner astrophotographer. So, I am sure I have missed things out, for which I
apologise. But the aim of this post is to give you something to work with
initially if it is the first time you have come across Sequator.
As well as light images, you can add darks and flats as well.
The basic settings for processing the images are straight forward. There are
other options that can be selected depending on the images being stacked and
these are explained in the manual which can be viewed here: https://sites.google.com/view/sequator/manual
Here then is my beginner’s workflow using sequator:
1.Sometimes, not always, I may batch edit my lights
before placing into sequator – using affinity photo – NOTE: only edit exposure,
contrast, highlights, shadows, and WB – I am aiming to try and reveal further
detail from shadow areas and prevent blowing out of brighter stars - if you do this, save them as TIFF files at end
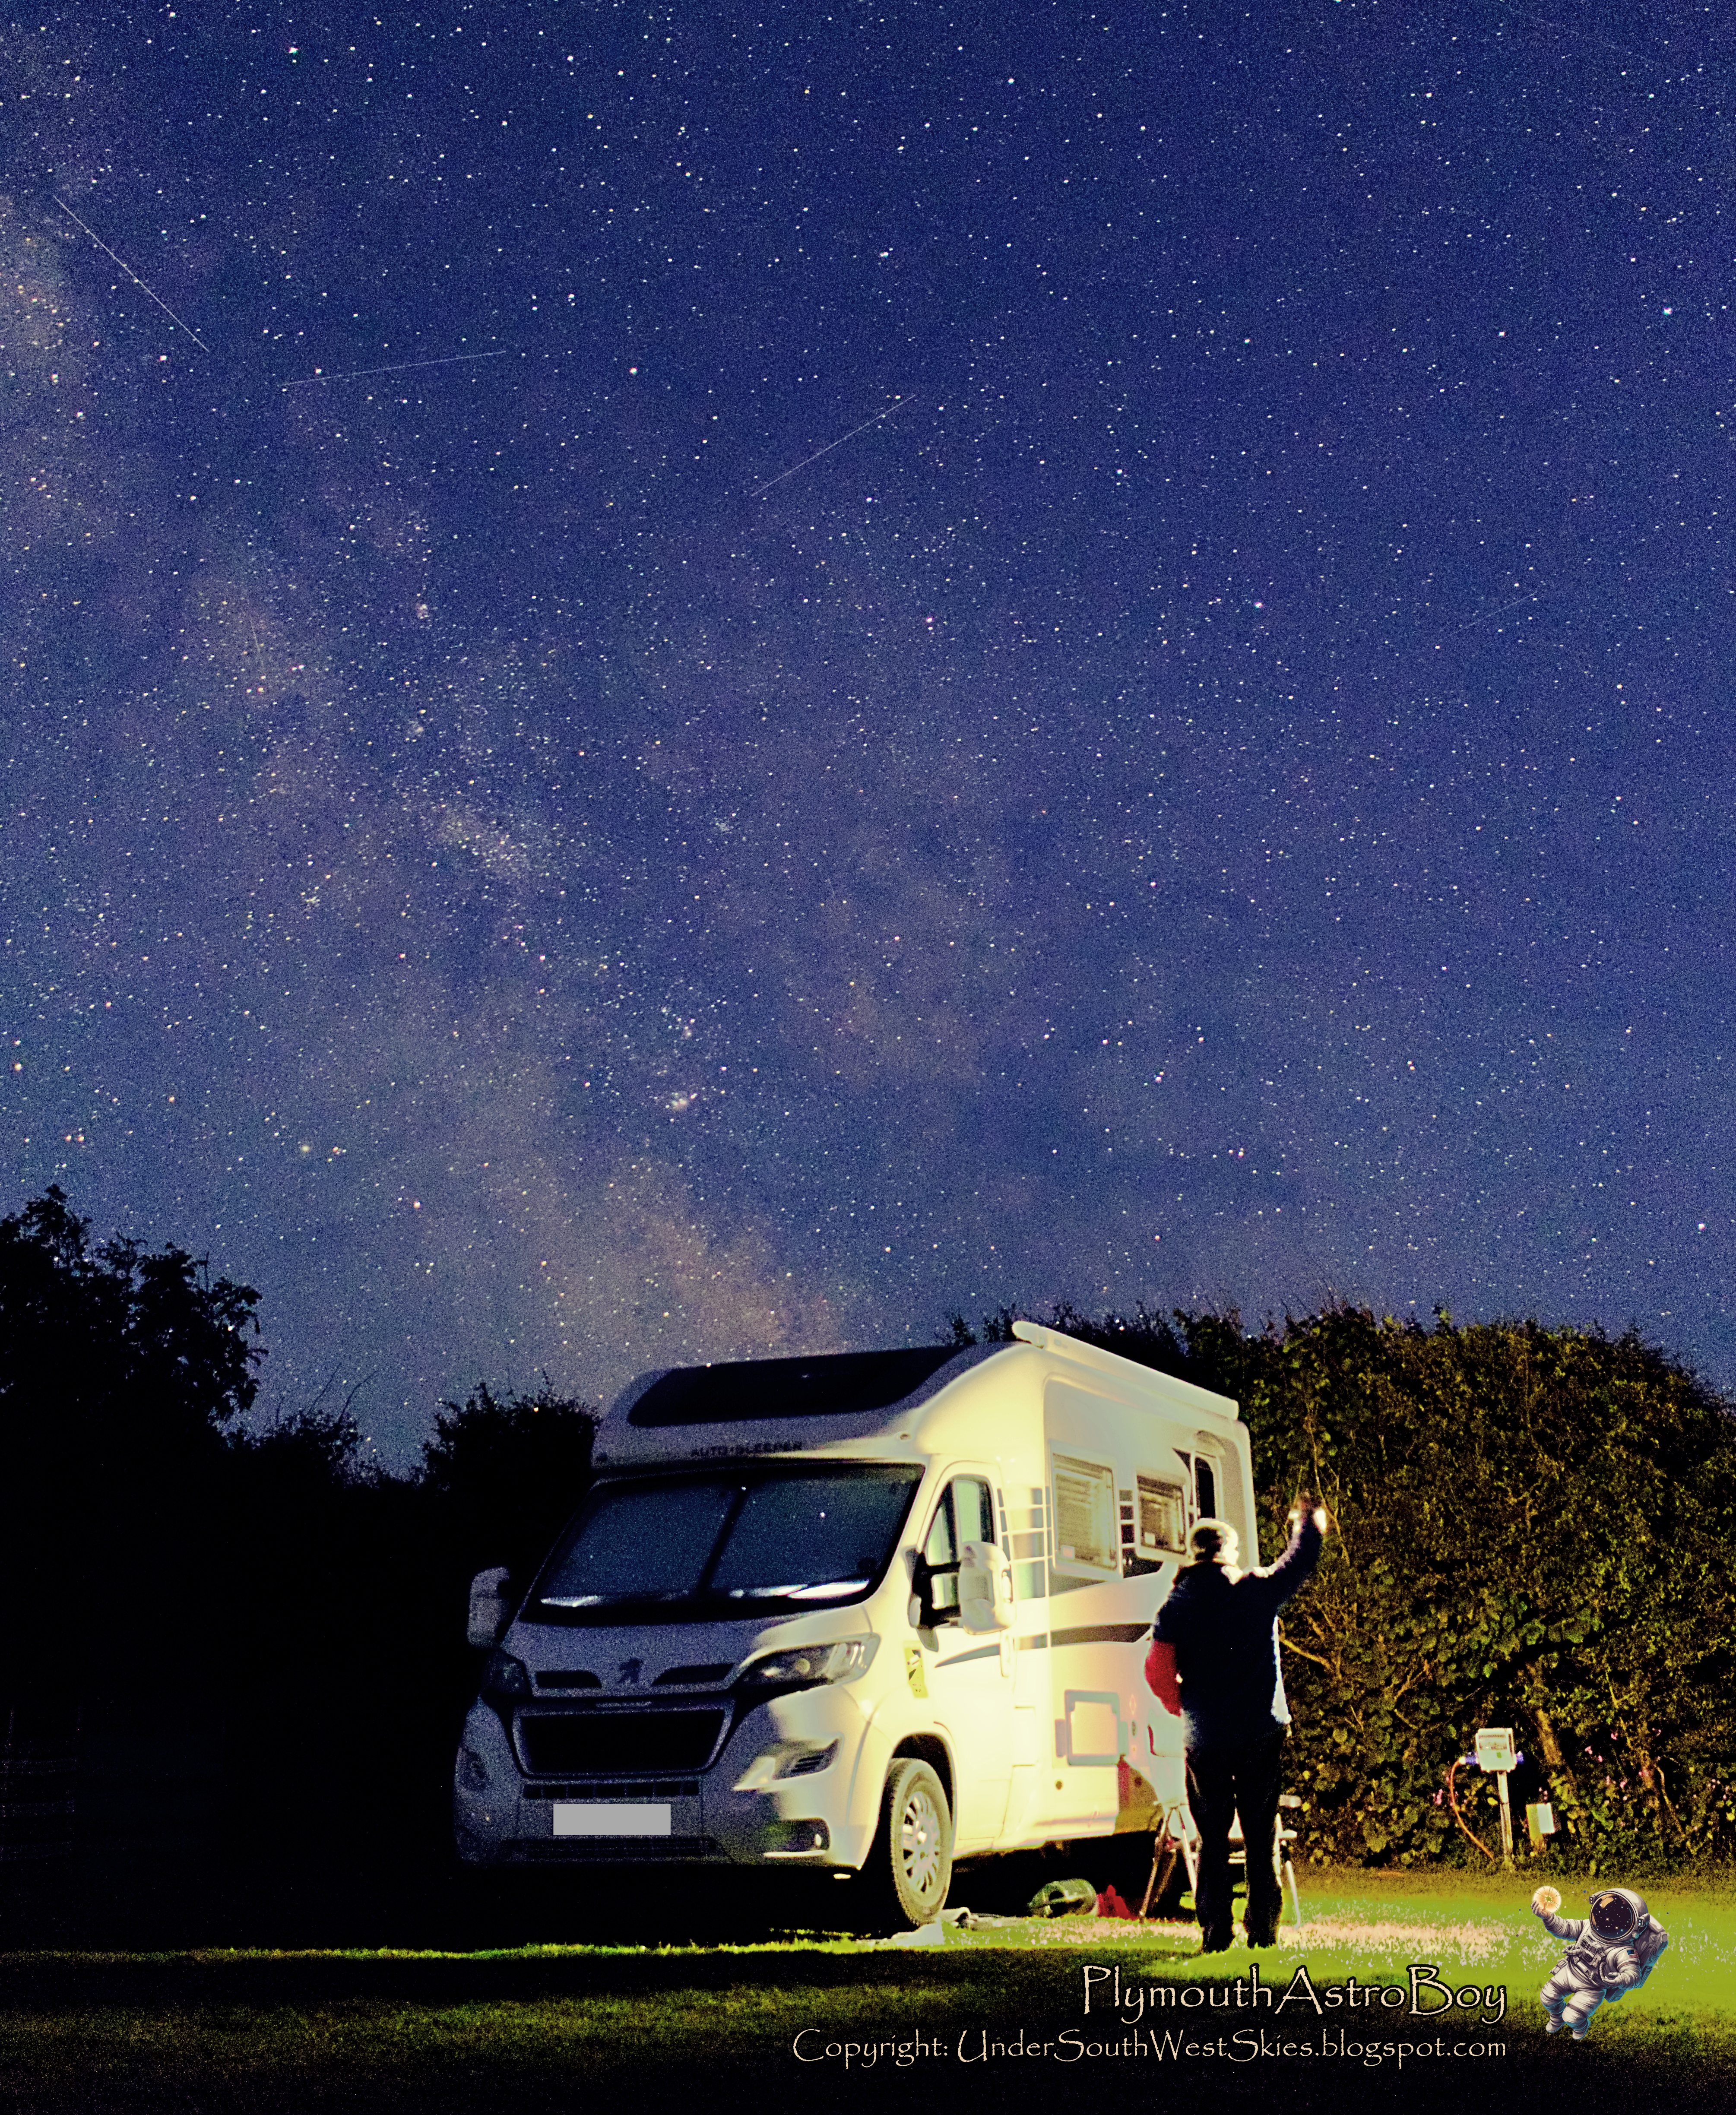
2.Open ‘Star Images’– drag and drop light
images into sequator (SQ) NOTE: star frames = lights; noise images = darks –
use same number of these as lights added – at least 5 - 8; vignetting images =
flats
This is one of around 15 images I collected on the night
ISO 3200 f/2.8 11"
I have blocked out the number plate for obvious reasons
3.Check ‘output’ box and name file – save as
Tiff 16 bit file
4.SQ automatically selects image as base image
– double click base image to choose image I want.
5.Composition – ‘align stars’ for all
images with foreground or just milky way and/or stars. (If doing star trails –
select ‘trails’ instead). On ‘Accumulation’ – select ‘best pixels’ –
slider across to HIGH – this will remove satellite and plane trails from final
image
6.Click ‘freeze foreground’(bottom LHS) if
images contain foreground elements. Check box ‘selective’ alongside. Slider
across to ‘strict’. Select ‘best pixels’
7.Sky region– allows you to help Sequator decide
which part of the image is sky and which part is foreground.Use ‘boundary line’ if you have a flat
non punctuated horizon line between sky and foreground. Use ‘irregular mask’
for complicated horizon or foreground objects punctuating it. Mouse scroll
wheel will green paint in sky area. Leave little gap between foreground and sky
that has been blanked out. (Right mouse click = eraser for mistakes). Click ‘auxiliary
highlight’.
8.Auto brightness – off. HDR – off (although
try as on if different exposure levels between images – if final image is over
exposed – redo and check both these to on) ‘Remove dynamic noise’ – on.
It removes hot pixels – especially useful if images are long exposure ones. If
not using dark images – reduce distortion effects – I keep on ‘auto’ as it
seems to remove any star streaking in the outer edges and corners of my final
stacked image.
9.Check ‘light pollution’ – only if present
in images. Check ‘uneven’ or ‘deep sky’ – depending on conditions. Don’t apply
light pollution too aggressively. I find it gives horrible results and so
unless there is major light pollution – I don’t use it.
10.Can check ‘intelligently aggressive’ box
or leave unchecked an use slider to determine how much light pollution
compensation to apply. Default – check the box.
11.Check ‘reduce distortion effects’ box to
auto. Check ‘complex’ box at bottom
12.Ignore rest of boxes on menu
13.Click ‘start’
14.On final image – zoom in and check any areas
with trees etc for stacking artefacts etc.
Around seven minutes processing to this, the final stacked image, saved as a TIFF file and ready to import into Affinity Photo for further processing work
In Affinity Photo, I do some post editing work on the final TIFF image from Sequator. Post editing skills development is a focus on mine for 2025. Why? Because I really suck at it! 😭
Anyway, from the image above via the images below:
and finally ending up with this:
Best I can do with my current limited post editing skills and knowledge of Affinity Photo tools and workflow practices. Ho Hum! Not Bad for a first effort I guess.
Sequator can be used for star trails as well. I haven’t done
any star trail work yet but if you are interested here are two websites that
give tips:
Two videos about Sequator that I found useful were:
As always, I hope this has been helpful if you are a beginner. If I have anything wrong or if you can offer some better tips, then please drop me a comment below so that I can update the post.
As always, dark skies to you all, stay safe and take care out there. Have fun
An aim for this year; to get a decent milky way selfie!
Below are the selfies I took last year. All
of them can be significantly improved upon.
So, what have I been doing? What do I need to do to raise my
game further this year?
This is post 6 in my blog series ‘Beginner’s guide to
taking your first milky way photograph’ – a series in which I share my
learning journey thus far towards this aim. As always, please remember I am
writing as a complete beginner to astrophotography and the sole rationale for
my entire blog is one of helping beginners (like me) make some rapid ‘basic skills’
progress in their astronomy and astrophotography knowledge.
My first effort at a milky way selfie taken at Mesa Verde Lodge in USA
In the car park battling with stray car headlights and random security lighting coming on and off
This was a single exposure
What equipment do I use to obtain a milky way selfie?
·Intervalometer (although I am thinking of
getting a remote shutter release at some stage this year)
Previous posts will give you tips about planning for milky
way photography, additional equipment needs and basic camera and base astro
settings. But, here I will stress a couple of things I discovered last year.
For a good selfie, you need a dark sky location.
Secondly, if you are doing a silhouette composition, you
will need to find a location where you are higher than your camera i.e. you are
shooting upwards slightly so you are silhouetted against the milky way. You can
also use a light source such as a light orb, headtorch or adjustable LED panel
as well.
Your image composition should tell a story - see my previous
post on composition tips. If I am doing a ‘headtorch looking up to milky way
shot’ I shoot in portrait. If I am using an orb to light some of the landscape
around me – I shoot in horizontal.
To get a sharp silhouette or image of myself, I am to make
my self smaller in the frame by either going away some distance from my lens or
by using a very wide-angle lens which will make me look smaller in the frame.
In either case I am trying to be not further than 8 – 12m maximum from my camera.
I found focusing your camera for a selfie shot to be
tricky. I have given tips on focusing at night in a previous post on camera
settings. For now, I’d suggest you either focus on the sky itself (infinity)
and you stand somewhere as close to the hyperfocal distance as you can. Alternatively,
I an focus on myself – I mark where I am going to stand, return to my camera
and then focus on that marker.
Of course, the issue about a selfie is simply this – how long
can you stand still for? How hard is it to stand still during the exposure? If
you are holding a lighting orb? Or when there is a slight chilly wind blowing?
Practice getting a comfortable pose. I found that breathing out very slowly
when taking the exposure helped enormously. Alyn Wallace in one of his videos I
have embedded below recommends a sitting pose if you find standing for any
length of time difficult.
Taken down the Roseland peninsula in Cornwall at Treveague Farm
Another single exposure but one where I held the light orb for too long so that it completely washed out the motorhome
What camera settings do I use?
·Manual mode
·RAW
·Lens focusing – manual
·No light pollution 1600/3200 ISO; light
pollution then 800/1600
·Not using star tracker – then shutter speed 10 –
20” depending on 300 rule and lens focal length with aperture f/2.8;
·Doing two images – tracking and stacking sky –
f/4.0, ISO 800, 30” shutter speed; combined with a blue hour foreground exposure
with me in it, experimenting with shutter speed, aperture and ISO settings
·I tend to do test shots irrespective of whether
single or tracked or stacked exposures – checking against histogram
How do I take the photo if I am standing in the scene?
You will need a remote shutter release, or an
intervalometer, or use your camera’s internal shutter release timer.
Again, the videos below give plenty of tips but this is how
I do it. I use an intervalometer on which I set a delay – that’s the time
period I have to get into my location and pose. I also have my camera’s 10”
delay setting switched on. This means once I am in position, the 10” delay on
the camera will then kick in – I can see a red flashing light or hear a bleep when
that happens – this is when I firm up my pose! I then mentally count down my exposure time in
my head and then add another 10” on top of that before I finally move out of
pose.
Single exposure with illumination from my smartphone
Milky Way at Wembury Beach
Did this work last year?
Yes…..and no……!So
what am I going to do differently this year? Not sure yet is my answer. I will
start with what I did last year and then try something different. Rome wasn’t built
in a day. I am expecting lots of duff shots but that is part of the fun. I tried single exposures, so maybe try and perfect this a little more and do some stacked/tracked/blended shots this year as well.
If I make any changes to the above approach, I will add a
postscript update below.
How much didn't go well in this effort? Where do we start? 😭
Well, I tried although Lord knows why! 😆
In the meantime, if you have any better tips and approaches,
then why not share them in a comment below so that future post readers can
learn from your experiences too
Dark, clear skies, stay safe, enjoy the forthcoming return of
the milky way to our northern skies
Steve
The videos below helped me on my first steps to taking a milky way selfie
This is the fifth blog in a series of posts in which I share what I am learning on my ‘journey’ towards obtaining a good milky way night time image. In my second year chasing down this aspiration, last year was dabbling and learning lots. This year, I want to ‘nail’ one or two good milky way landscape images. It’s a mission! Whether I can deliver on it or not is a moot point though!
If you have just arrived at this page, you may want to go back and read the first four posts in this series before reading this one. They sort of follow a logical order.
This blog post series shares what I have learned thus far to help encourage those of you seeking your first milky way image. Remember I am still at the very beginning of my learning journey. I am no expert. I claim no expertise in any way at all. A complete novice in photography and astrophotography. This entire blog is written from that perspective – a chronicle of my learning journey written by a beginner for other beginners. I know very little about anything frankly but therein lies the attraction. If I can do it with my very limited knowledge – then so can you; and probably better, as I am a rather slow learner at the best of times.
As always, if I have made any mistakes in my posts, I apologise. Please drop me a comment highlighting the issue and I will correct it immediately.
Please note: I will not be going into huge depth about how things work and why we do things the way we do. I’m not dismissing the importance of having a theoretical understanding – its critical – I’m just saying it’s not the focus of these blog posts. My aim, is to just get you out there, obtaining a first milky way image.
To help you achieve this, I will outline some simple answers to these questions:
1.What equipment do we need?
2.What advanced planning is needed to ensure success on the night?
3.What base settings can we use to help us get success?
4.What foreground composition considerations do we need to make?
5.What are the different techniques for getting a milky way photograph?
6.What do we need to consider if we want to do a milky way selfie shot?
7.How can we improve our milky way photography skills?
8.What is a ‘beginner’ workflow for post editing our milky way photographs?
Our fifth question then - What are the different techniques for getting a milky way photograph?
Up to now in this series of blog posts, I have been looking at doing single
exposure images of the milky way in a landscape setting. I touched
on occasionally, an alternative method, doing two separate images – one
exposed for the sky; the other for the foreground. We then blend these in post
editing to create one single image.At
its simplest, I call this technique ‘exposure blending’. We might
return to this technique later in the post.
However, there are a series of other techniques that we
could use to get our first milky way image. The key concept, isn’t it, is about
getting as much light as we can to our sensor through longer shutter speeds or
wider apertures – but this can bring the problems. Longer shutter speeds
introduce movement errors; wider apertures mean more of our scene will be out
of focus.
However, there are other approaches we can adopt which can
mitigate some of these impacts:
·Star stacking
·Using a star tracker
·(Long exposure foregrounds)
·(Focus stacking)
This is a post series by a beginner for beginners with
the aim of helping you obtain your first milky way landscape image.
Once over that first hurdle, you will be so keen to get other better images
that you will advance your own learning rapidly through YouTube tutorials,
on-line reading and plenty of practice. I am a very slow learner as you will
have already deduced from previous posts – so it takes me time to assimilate
and understand the basics!
This is one of the very first tracked/stacked/blended exposures I took
6 tracked images of 120" each, and stacked in deepskystacker.
I then did a separate foreground exposure and blended them very badly together post editing.
The sky shots were done 100m away out in a desert section. I had been warned about mountain lions roaming the area so I remained close to the motel ranch entrance. It was a very dark sky location and when a ranch domestic moggy suddenly appeared between my legs meowing loudly, it is the closest I have come to a major instantaneous heart attack!
So, lets investigate the technique of star stacking.
In star stacking – you take multiple photographs of the sky
and stars using short shutter speeds. These are then aligned in software which
creates a single final image – like an average of them all. This approach
reduces the amount of ‘noise’ in the image.
If you do deep sky astrophotography (my other passion) then
you will be familiar with ‘stacking’ multiple images.Stacking allows you to use faster shutter
speeds for pin point stars, and smaller apertures/higher F-stop numbers to
improve the depth of field in your image, the focus of the stars and reduction
of aberrations.It sounds counter
intuitive doesn’t it – faster shutter speed and narrower aperture – but because
you have taken lots of images and stacked them together – you are getting,
effectively more light into the final image.
What equipment will I need for star stacking?
·Tripod and ball head
·Intervalometer
·(Lens warmer)
·(Star Tracker)
What would be good starting settings for star
stacking?
Firstly, you compose your scene. See my
previous post about compositional tips.
Then we set our base astro settings. I start
with ISO 800 or 1600; F/2.8 and then a shutter speed that is matched to my lens
focal length (see my post on settings). I’ll go for a shorter shutter speed
than the 300 rule suggests for my crop sensor camera so that I can ensure
pinpoint stars.It is however a
balancing point as a shorter shutter speed means I will not get as much detail
out of the fainter areas of the milky way. ISO wise? You can correct exposure
during post editing. I find that on my camera if I use too high an ISO it
produces images with lots of noise – which is what I want to avoid.
How many photos to take? I take many in quick
succession. Nothing about camera position or composition gets changed between
exposures. I tend to take between 10 and 15, depending on my base astro
settings. 15 photos at 10” = 150” of integration time (the combined exposure
time total). 150” is approximately 2 and a half minutes – that is a lot of
light gathering! But there is another reason why between 10 – 15 is ideal –
during that shooting time – the stars above are moving – well changing position
as it is us on Earth who are moving beneath them. Anyway, the stars positions
will change significantly, the more exposures you take. Keep it simple!
It is the opposite when doing deep sky astrophotography –
the more images you stack, the better the final image is likely to be. With no
foreground to consider, you just must periodically reframe your target back
into the middle of your frame.
This was a single exposure shot
What about the foreground element in these milky way shots?
If I am star stacking, I make it a personal rule that
I am doing a separate foreground image, from, as far as possible, the
same tripod position and ball head angle. I am exposing for the foreground
specifically, not worried about star trailing and will probably be thinking
about hyperfocal distance or focus stacking. I will be using a lower ISO. I may
well try and take each exposure at a shutter speed of 1 – 4 minutes. I’ll be
watching the histogram with an eagle eye. In saying all this, a friend, also a
beginner, prefers to go for one long shot using the hyperfocal distance method
– so a shot somewhere around 4 – 10 minutes. I’ve not tried this approach – I
would worry about something moving within the shot during that time. For
example, on my south coast, there are plenty of fishing boats out at night – a
moving fishing boat will leave a significant trail across a 5-minute image!
What are the advantages and disadvantages of the star
stacking approach?
Advantages:
·more integration time but with benefit of
narrower apertures and shorter shutter speeds
·reduced noise visible in final image which means
more detail is revealed and a better noise to signal ratio – this is because
multiple photos average out the noise resulting in clearer images
·stacking software tends to remove satellite and
airplane trails (not always, but most of the time)
·pin point sharp stars
·increased detail for post editing work
especially with regard to colour accuracy
Disadvantages:
·the time it takes to do multiple exposures
·potential alignment issues if there has been
wind movement during the taking of the images; some star trailing if you left
too longer gap between the multiple exposures
·increased post editing time – extra steps and
complexity using some of the software; and you must raise your game in terms of
understanding some more complex editing techniques (which is my current BIG
problem!)
·potential loss of detail in the foreground – my
sequator images always appear with blurry foregrounds which are dark and
lacking in detail – hence my shifting to taking a stacked star sky image and a
separate stacked or single long exposure foreground image and blending them
post editing to one image
·over aggressive smoothing and averaging during
stacking software processing – leading to an over smooth image which lacks
milky way/star detail
What software will you need to stack the images you
collect?
There are three pieces of software that can stack your
collected images
·DeepSkyStacker – free and great for sky
shots with no foreground
·Sequator– for images which are
predominately sky and a small amount of foreground (around 10% or so)Windows platform
·Starry Landscape Stackerfor Mac users
I will do future posts soon about using Sequator (for
beginners) and a similar post for DeepSkyStacker – as I use windows platforms. It
will be part of my post about post editing work flow for a milky way image. Although
I won’t do anything on using Starry Landscape Stacker – I will post some useful
blogs and YouTube tutorials which give details for Mac users to follow.
A stacked shot using sequator for the first time
I clearly got my base astro settings wrong in this image sequence
How can we use a star tracker to gain our milky way
image?
I love my star trackers. I have two – an Ioptron Skytracker
Pro and a Skywatcher Star Adventurer 2i Pro. The former I use for milky way
imaging; the latter for that and for deep sky astrophotography as well. I am
considering an upgrade of the SWSA2i to a SWSA gti GOTO model but that is all
the subject of a future post!
So, if you are new to the concept of star trackers –
what are they?
Trackers go between your camera and your tripod and they
move your camera in rotation with the Earth so that your stars are followed
precisely with your camera and there is no star trailing. Basically, a tracker
is motorised and allows you to compensate for the rotation of the Earth.
It brings huge benefits:
·You gain far longer exposures – I can easily get
up to 3 – 4 minutes on the SWSA2i with no problem. Using my milky way lens – I
can get 5 minutes+ easily if I wished.
·That is a huge amount of light capture and a
higher signal to noise ratio for a single exposure.
·It results in images with less visible noise ad
better colour accuracy
·Images have more detail within the sky and are
sharper throughout. Perfect!
·Moreover, I can use narrower apertures and lower
ISO’s – so I can go to ISO 800/1600 maximum consistently. Narrower apertures
also lead to less aberrations and vignetting
I wrote a previous post on how I set up my SWSA2i with step-by-step
guidance:
1.Level my tripod – I have a bubble level on my
tripod but I also use a small spirit level as well.
2.Attach my equatorial wedge mount to the tripod –
I don’t use the wedge that came with the SWSA – it was the first thing I
replaced as I found the original insufficiently precise for my deep sky
astrophotography – instead I use a William Optics wedge. Far superior – well
engineered. However, I want to stress that for milky way photography with
smaller lenses and camera weights – I found the original wedge was more than
satisfactory.The wedge by the way is
also known as an altitude-azimuth mount! One of the things you must ensure on
such a wedge is that you have set your latitude – your angular elevation. Don’t
forget to do this.
3.The tracker mount now goes on top of the wedge
and I make sure it is securely mounted and that the level of the tripod hasn’t
changed.
4.At this point I might add in my optional
counterweight kit – to balance my lens/camera rig and reduce wear and tear on
the motor itself.
5.Before going any further, I will now carry out
the Polar Alignment procedure using the little polar illuminator which comes
with the SWSA – I will outline this process in more detail later in this post.
I also use a green laser pen to line up with Polaris – mine attaches to the
viewfinder on the tracker – making it so easy.
6.Having ensured an accurate polar alignment, I
now attach the base plate and ball head to the tracker mount. I prefer a ball
head but you might use some other accessory to attach your camera – a two-way
head; a MSM Z plate etc. Be very, very gentle – try not to move the tripod or
mount even a fraction – otherwise your polar alignment will be out and you will
have to start the set up again.
7.On goes my camera/lens combo. I use a L bracket
on my DSLR (see previous post on camera settings). I add on any accessories –
so dummy battery pack, intervalometer etc. However, this is where you can throw
out your polar alignment so,
8.Redo your polar alignment or at the very least
re-check it again. Fine tuning may be required.
9.Now do some test shots – I turn the tracker on
and do a 30” and 60” test shot to see that the tracker is working properly and
that there is no star trailing. Zoom in to the review image – check the
corners, the centre – are stars pin point sharp dots? All being well – I now do
test shots at 120” and 180” as well. Pinpoint dot stars – then I am ready to
go.
My Polar Scope app to help locate Polaris correctly
What is polar aligning?
A tracker has to have its rotational axis aligned with the
north celestial pole (NCP) or the south celestial pole (SCP). In the northern hemisphere
– we can use Polaris which sits close to the NCP and this is what I am focusing
on now in this blog post. Getting sharp pin point stars really does rely on
getting polar alignment correct.
How to locate the NCP and the SCP
If I use my 14mm Samyang lens, then I can get away with just
a rough alignment to Polaris. I use my green laser pen which attaches to my
tracker polar scope. Quick and easy.
For a precise polar
alignment, I will use the polar illuminator, the green laser pen and an app that
comes with the SWSA tracker. It shows precisely where to place Polaris in my
polar scope reticule for any given time in a particular day.I will adjust both altitude and azimuth knobs
until I get this precise locating of Polaris.When this adjustment has been made and my various knobs have been
tightened, I check that my hemisphere switch is set to north.
The polar clock inside my SWSA app
What are my base astro settings and additional
equipment for tracked images of the milky way?
·Aperture F/2.8 although do some test shots to
see which aperture gives you best result. There is a case to be made for stopping down to something like F/4.0 - you can do longer shutter speeds to make up for this - the narrower aperture will bring better focused, sharper sky and greater depth of field within a scene
·Focal length 14 – 35mm max
·Shutter speed 120 – 180” normally. Sometimes I
will go up to 240 or 300”.
·ISO 800 (although I often find my Canon 800D
performs better at ISO 1600 for some strange reason) If it is windy – reduce your
shutter speed length and increase your ISO a little.
·Check your histogram – most of the information
should be in the midtones zone. Zoom into one of the nebula that will appear in
your milky way core image an see if that is correctly exposed and detailed – if
so – all is good
·Remember a tracker will blur a landscape element
– so if you use a tracker – separate sky and switch off tracker for separate foreground
images to later blend post editing.
·I use an app with my tracker that also controls
my camera settings – you made need an intervalometer. Have a lens warmer on
standby as well just in case of high humidity/fog. You camera will get warm taking
longer and more numerous exposures.
I hope this blog post has given you an overview of stacking and tracking techniques. I found the videos below particularly helpful.
As always, any mistakes, please forgive me - post a correction in the comment box below and I will get it sorted in the main post text above. Similarly, any further tips, thoughts or observations on tracking and stacking for milky way images, let me know below.
It just remains for me to wish you clear skies - stay safe, have fun
Beginners guide to taking your first milky way
photograph – 4
This is the fourth blog in a series of posts in which I
share what I am learning on my ‘journey’ towards obtaining a good
milky way night time image. In my second year chasing down this aspiration,
last year was dabbling and learning lots. This year, I want to ‘nail’ one or
two good milky way landscape images. It’s a mission! Whether I can deliver on
it or not is a moot point though!
If you have just arrived at this page, you may want to go
back and read the first three posts in this series before reading this one.
They sort of follow a logical order.
A single image exposure with some foreground light painting
My first effort at light painting
After reading the post, come back and re-examine this photo
Did I try to follow any of the compositional tips I outline below, and to what success, if any?
This blog post series shares what I have learned thus far to
help encourage those of you seeking your first milky way image. Remember I am
still at the very beginning of my learning journey. I am no expert. I claim no
expertise in any way at all. A complete novice in photography and
astrophotography. This entire blog is written from that perspective – a
chronicle of my learning journey written by a beginner for other beginners.
I know very little about anything frankly but therein lies the attraction. If I
can do it with my very limited knowledge – then so can you; and probably
better, as I am a rather slow learner at the best of times.
As always, if I have made any mistakes in my posts, I
apologise. Please drop me a comment highlighting the issue and I will correct
it immediately.
Please note: I will not be going into huge depth about how
things work and why we do things the way we do. I’m not dismissing the
importance of having a theoretical understanding – its critical – I’m just
saying it’s not the focus of these blog posts. My aim, is to just get you
out there, obtaining a first milky way image.
To help you achieve this, I will outline some simple
answers to these questions:
1.What
equipment do we need?
2.What
advanced planning is needed to ensure success on the night?
3.What base
settings can we use to help us get success?
4.What
foreground composition considerations do we need to make?
5.What are
the different techniques for getting a milky way photograph?
6.What do
we need to consider if we want to do a milky way selfie shot?
7.How can
we improve our milky way photography skills?
8.What is a
‘beginner’ workflow for post editing our milky way photographs?
Our fourth question then - What foreground composition
considerations do we need to make?
This is the one area I am hopeless at. Knowing the theory is
one thing – remembering to put it all into practice on a night session – is completely
something else. I just don’t seem to remember it all! Maybe I need a simple
check list. If you have been following this blog – you will know I like check
lists!
What I do know, from quick internet image searches, is that
the Milky Way is a fantastic subject for a night time landscape photograph, as
long as some basic compositional thinking has been applied!
So, in no particular order, here are my tips for getting
a good foreground compositionon the night.This works for both single exposure images and for dual image shots –
where you shoot the sky and the foreground separately and blend together later
in post editing.
Before we look at the list of tips – when do we take a
separate foreground shot during our shooting session?
I personally try during blue hour just before twilight ends
and darkness begins. But, I have also done them when its been really dark. I
tend to do my foreground shots first and then any separate night shots
immediately afterwards – but that is just me.
The other thing I would emphasis at this point is this – find
your compositions during day light hours! I talk more about this in my ‘planning
post’ - what I do know is that your
choice of foreground composition will make or break your final image and it is
easier to find a good composition in the day time than in the dark! From
foreground to background will be in view and easily seen; you can align
features in the landscape more easily; and most importantly for me seeking
milky way compositions – I must be looking for things in a southerly direction,
for that is where the Milky Way will be in my northern hemisphere sky.
Watching a lot of videos by Peter Zelinka, ‘Nightscape Images’
and Alyn Wallace, I have always been struck by one thing. They are all very
clear that your nightscape image should tell a story and pull a viewer into the
scene.
What factors do I consider before deciding on a final composition?
·What is the rationale/target audience for the
photo? What is the story I am trying to tell?
·Which way is the Milky Way orientated?
(Vertically – then great for vertical compositions; low in the sky and in an
arc – then great for a horizontal composition).
·What is the subject/context of the shot – how
does it connect celestial sky with terrestrial ground?
·How can I use a milky way orientation to enhance
a particular night-time landscape shot? Is there a particular foreground
location that will enhance my focus on the Milky Way?
Here I focus firstly on the nature of the terrain – Valley sides? Cliff lines?
Rolling hills? Having decided on the ‘framing’ I then focus on what is the
potential horizon line like; what details are there in the mid and immediate
foreground? At this point, I am moving around a little seeing what features I
can use and align.
·What does night AR show me in PhotoPills at
possible milky way shoot locations? (see my previous post on planning)
·Is the scene truly dark? Will it require any
light painting? (topic for a later post when I have tried some this season) How
much light pollution is there and how will that affect any shots?
·Will I go for a single exposure shot; separate sky
and foreground shots; stacked shots of sky and foreground; use a tracker?
·Is depth-of-field important– if so, will I need
to do focus stacking? (see previous blog post)
·Will
there be any movement in the composition e.g tides, tall grasses, tree branch
movement in wind etc?
·Do I want to do a milky way selfie shot? (me in
the landscape looking at the Milky Way)
Here then, are my foreground composition tips:
You are NOT trying to get all of
these tips in one photograph! As a beginner, I found just trying to get one or
two things right in a photo is a good start – baby steps and little experiences
– and build on those. There again, I am coming from a low base – I am, bluntly,
‘a spray and pray’ photographer – take loads and hope one comes out OK! Appalling
confession! Sorry!
·Have a focal point for your
photographs – the milky way and then a particular foreground/landscape element which
will draw a viewer into your photograph. Someone told me to imagine I was
standing in front of a stage on which a story was going to unfold about the
landscape in front of me – what elements in the landscape would I need to
include in order for the ‘landscape story’ to be understood visually?
·use leading lines in the
foreground to create a flow in the picture - back to the milky way in the sky
e.g. road/path/track, wall/fence/hedgerow, river/stream etc. Leading lines
create a sense of depth in the image. They catch your eye and lead you to
something in the image – the Milky Way in our case. They might pass an
interesting object on the way! Combine them
with a vanishing point, where such features disappear into the background. Don’t
let the leading line/edges lead the eye out of the frame!
·Have your rule-of-thirds grid switched onin your LCD rear screen and use it to place foreground objects/focal points/leading
lines – the horizon on one of the horizontals; foreground objects on the
vertical lines at intersection points with horizontal lines. Leading lines
within the thirds etc.
·Get some of your foreground interest
objects to break the horizon line. (Good foreground objects to seek out
include: rocky outcrops, old buildings, old machinery, fence posts etc; mid
foreground objects – trees) Create a sense of space (negative space) around
central foreground objects in your scene. Shoot foreground objects at an angle.
·Have something in the landscape framing either side
of your milky way element
·Aim for some symmetry and balancevertically
and/or horizontally in your image i.e. Use the grid to help you equally
distribute your foreground elements so that they are pleasing to view. Too many elements on one side may leave a
viewer thinking the picture is over-weighted one side, empty on the opposite
side etc.
·Ensure that as much of your landscape is in focus
as possible – see previous blog post about planning – focus stacking and
hyperfocal distance
·Keep tripod lowish to ground and level
– use camera ‘spirit level’ tool to get horizontal horizon line – good for
getting reflection of stars in calm pools and lakes.
·Keep all of your landscape elements within
the frame – don’t let them get cut off at the edges – this is back to
the earlier point about creating space around foreground elements – breathing room.
So don’t cut off mountain ranges in the distant horizon; or a good rocky
outcrop in the very near foreground of a beach scene; or the wild flowers on a
cliff top shot along a cliff line back to the arcing milky way.
·If there is moon light present– if moon
is partial and low in the sky – keep it to side or behind you when shooting and
use higher F-stop for greater depth or field or reduce shutter speed
I hope that these tips will give you something to aim for when taking your first milky way shot. If you have any further tips then drop them in a comment box below so we can learn some more. In the meantime, have fun, stay safe, clear skies and good luck.
Steve
Some homework
Analyse the photographs above, some of my first efforts, and from just a compositional viewpoint, analyse what I could have done to improve the compositional framing