Blogger isn't always the most intuitive platform to navigate - but it is free and simple to use and manage.
To help you find information quickly on this blog, you can
- use the search bar using key words e.g. Asiair mini
- use the blog menu list by date
- use this page which will be regularly updated https://undersouthwestskies.blogspot.com/2025/12/want-to-find-something-quickly-on-my.html
- visit my home page https://undersouthwestskies.blogspot.com/p/welcome-to-my-astronomy-and.html
Beginners guide to getting your first milky way photograph – 2
This
is the second in a series of blogs in which I will share my learning journey thus far towards obtaining a good milky way night time image.
This is my second year chasing down this aspiration! Last year I dabbled but learned lots. This
year, I want to ‘nail’ one or two good images at local SW locations I have
listed in my notebook. It’s a mission!
If
you have just arrived at this page, why not go back a blog post and read the first post in this series about ‘equipment needed’ for milky way photography.

This
blog post series aims to share what I have learned and achieved thus far to
help encourage those of you seeking your first milky way image.
Please remember I am still at the very beginning of my learning journey. I am no expert. I claim no expertise, so, a complete beginner to astronomy and astrophotography. This entire blog is written from that perspective – a chronicle of my learning journey written by a beginner for other beginners. I know very little about anything frankly but therein lies the attraction. If I can do it with my very limited knowledge – then so can you; and probably better, as I am a rather slow learner at the best of times. If I have made any mistakes in my posts, I apologise. Please drop me a comment highlighting the issue and I will correct it immediately.
I
will not be going into huge depth about how things work and why we do things
the way we do. I will give references for you if you wish to pursue these areas
further. I’m not dismissing the importance of having a theoretical
understanding – its critical – I’m just saying its not the focus of these blog
posts. My aim, is to just get you out there, obtaining a first milky way image.


To
help you achieve this, I will outline some simple answers to these questions:
1. What equipment do we need?
2. What advanced planning is needed
to ensure success on the night?
3. What base
settings can we use to help us get success?
4. What foreground composition
considerations do we need to make?
5. What are the different techniques
for getting a milky way photograph?
6. What do we need to consider if we
want to do a milky way selfie shot?
7. How can we improve our milky way
photography skills?
8. What is a ‘beginner’ workflow for
post editing our milky way photographs?
So, today’s question – 2. What advanced planning is needed to ensure success on the night?
If I was logical I would go through questions 3 – 6 first and then come back to planning, but I don’t think logically, so bad luck! In my head, knowing a little more about the milky way will help us better understand the reasoning behind the settings and techniques we use – well, that’s my thinking; most of the time I’m wrong but here we go! It worked for me – maybe it might work for you too. If not – skip forward to future posts and come back to this one at the end.
I subdivide this question about planning into these topics:
- keeping safe and warm
- knowing where and what orientation the milky way can be found in
- weather on the night
- finding a dark sky site
- scouting a location during daytime
- shoot for the follow up editing
Keeping safe and keeping warm.
In the dark, navigating varying terrain, carrying equipment –
possibly remote, isolated location with variable internet and mobile smartphone
signal! On your own? Worst case scenario – could you survive safely until help
arrived, should the unfortunate happen? A trip or fall?
Or how about standing around for lengthy periods of time as
temperatures drop, can you remain comfortable, warm, positive, and focused on
the tasks in hand?
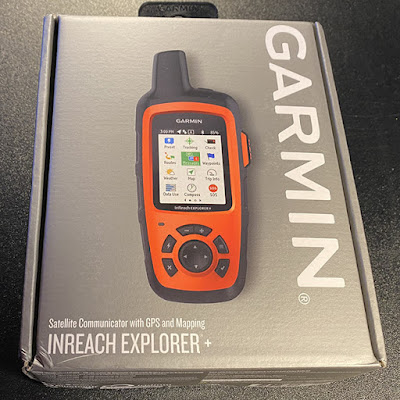
First off – emergency communications – carry a
personal locator beacon (PLB). Something that sends out a distress
signal via satellite to alert local rescue services. If it sends simple text
messages, even better! I use the Garmin Inreach Explorer for everything –
sailing cycling, walking, astronomy/astrophotography, mountaineering (not that
I do any of the latter nowadays – the knees can’t take it). It sends a distress
signal, shows basic maps of locality and allows the sending of simple preset
messages and texts to family. It is a subscription based PLB however. Don’t
just rely on a smartphone – there are areas of Dartmoor and our south Devon
coastline, for example, that I visit at
night where mobile signal is at best intermittent to non-existent – even in
this day and age of technology advancement!
Safety equipment to carry - Whistle, compass
and map of locality; first aid kit, survival bivvy bag and survival foil space
blankets. Multitool or good penknife. Small thermal insulating closed cell
folding seat mat. Know how to use them properly! I also carry two
‘long time’ red glow in the dark snap sticks – should I need rescue
assistance – they help rescuers locate you in the dark.
You may consider this overkill – perhaps it is – however, I spent
many years doing outdoor education instruction as well as teaching geography.
Better to have it than not – trust me on this! Have you got with you stuff that
could help you better survive the three hours or so it may take rescuers to get
to you – basic question!
And of course – the fundamentals – a route plan left
with someone – where are you going, when are you coming back, where
will you leave the car? Food and drink for the night – hot drinks;
high energy foodstuffs even warm foods. I carry flasks of hot water, teabags, a
small bottle of milk, a thermos of soup, sandwiches, chocolate, biscuits, trail
bars/trail mix. I find hot water in flasks stays hotter for longer than just
white tea.
Keeping warm – I’ve already done a previous post – find it here ( https://undersouthwestskies.blogspot.com/2025/01/beginners-guide-to-how-to-stay-warm-on.html ).
Essentially, few, well chosen layers are better than lots of layers! Trapped sweat
= damp against the skin = chilling rapidly! Base layers to wick
away sweat and trap heat against your skin; mid layers to
insulate you but also allow your skin to breathe. Finally, outer shell
layer – protects and insulates you from wind, rain and more. Extremities
– hands – gloves! So much fiddling and twiddling with buttons, knobs,
lenses – I go for a double layer system – base layer of thin fingerless gloves.
Outer layer of thicker gloves or woollen mitts. USB thermal handwarmers ready
in my pockets! Two hats –
one a Mountain equipment thin micro fleece sort of balaclava that can be a neck
buff, a beanie or a balaclava. A
thicker, fleece and thermally lined Berghaus hat with ear piece extensions. And
then, of course, my hood from my outer layer.
Don’t forget your feet! I really suffer from cold feet! I
go for sturdy light weight Gortex lined waterproof boots with thermal insoles
and then proper thermal wool loopstitched socks. As I said, my previous blog
post about keeping warm has more details. Do not skimp on your clothing!


Knowing where and in what orientation the milky way
can be found
Where to start – this was the bit I didn’t fully understand
last year and it left me frustrated on many a night because the Milky Way wasn’t
in the right orientation for the shot, I had in my head!
So, some simple milky way basics – all from a
northern hemisphere perspective – sorry to southern hemisphere people – but my
limited brain capacity can just about cope with this northern stuff!
The location and orientation of the milky way galactic core
changes through the year in the northern hemisphere. Here in the south west of England,
the core starts appearing at the end of February in the early hours before
sunrise. It starts fading from view in late October and can be seen mid evening.
The core can still be seen during January
and February but it is so low on the horizon and appearing so briefly, its
hardly worth shooting although I know people locally who do so, and very
successfully too.
In my neck of the woods, the Milky Way core will be to the
SE and flattish in spring during pre-dawn hours and to the SW and flattish
again by autumn just after dark falls. Mid-summer – it’s to the south and vertical
in orientation and can be seen from around 10.30pm until 2 am ish. Being at latitude
50 degrees, the core always remains pretty close to the horizon. The further
south you go, the higher above the horizon, it will appear. In the northern
hemisphere the milky way will at some stage appear as an arc across the sky,
normally from March to June and then again from August to October. Someone told me the other day you can see a
milky way arch during the winter months as well – west facing.
For southern hemisphere colleagues – I think it goes like
this: February rising in SE from around 1 am ish to sunrise. Summer months – long
nights due to winter (lucky souls) and the milky way will rise in the E and be
almost vertical during the hours of 7pm to dawn. Come autumn – the core begins
high in the sky but sinks down to the west from around 9pm to 2 am or so. Hope
I got that right! You get the longer
season and longer shooting times in a night!


So, how do we plan a milky way shooting session?
I use PhotoPills and Sky Safari Plus!
Stellarium and Planit Pro are other apps. Make them your friends! Familiarise
yourself with their functions as often as you can.

I love PhotoPills! So many tools and functions available;
genuinely useful to a new astrophotographer. Their detailed guides and YouTube
channel tutorials give you everything you need to know and learn to get the
best from this app.

The planner map is one to really use and understand. It can
show the position of the sun, moon and milky way core on a map – a red pin
marks your precise location. The milky way icon, a series of white dots of
varying size, show precisely where the milky way core and arch will be and at
what inclination at any given time during the night. Brilliant! Details about
twilight, sunrise; galactic core rise and fall times. Tonnes of useful
information in the planner.
And there is then the night time augmented reality screen.
Oh my! This is the tool for when you go scout out locations during day time. I
LOVE this tool! You can see your proposed scene location through your smart
phone screen, as if you were about to take a photo of it. AR then overlays an
image of the milky way over it and the screen overlay can then be scrolled forward
to the times you propose being there at night – it will show you exactly where
in your proposed shot the milky way will appear and at what orientation. It
does far more than this – here is a tutorial video on how to use it. A game changing planning tool.
You can access their tutorial videos here: https://www.photopills.com/videos
The user guide for the app is here: https://www.photopills.com/user-guide
https://play.google.com/store/apps/details?id=com.photopills.android.photopills&hl=en
Weather on the night
Clear skies! I can’t remember having many clear sky nights
over this last winter season here in the south west of England. Very frustrating
when trying to image deep sky objects. Some clouds can add interest and texture
to nightscape photos though.
Rule 1 on weather checking. There is no single 100% accurate
weather app. Go figure! So here is my
routine for weather checking a potential astrophotography night.
1. A general forecast overview – the Met Office weather app and if necessary, a deeper dive into its website to look at pressure charts etc. I am a geographer! Love a pressure chart! Can’t resist them! Anyway, getting a general overview of what to expect passing through the night. Not always 100% accurate but normally in the ball park on the night. https://www.metoffice.gov.uk/weather/weather-app
2. Clear outside – by First Light Optics – just up the road from me in Exeter. Free download app. Hour by hour cloud coverage percentages, Bortle range of your locality, moon rise and set times. Sunrise and sunset. Sky quality assessments. Dew point temperature, fog risk, humidity levels. Everything colour-coded and easy to read. Great app and overall, one I have found to be very accurate most nights. Brilliant planning tool and you can certainly in the UK enter your specific location to get as close as you can get locality summary. What it allows you to do is choose a specific shooting time window corresponding with your planning on PhotoPills and then check what the weather will be like for that time. https://clearoutside.com/page/app/
3. Windy – a newish app to me but one I am growing to really like – another nerdy geographer one but useful. Three hour block forecasts, radar imagery, cloud layering information, dew point, temperature, rainfall amounts etc. I cross-reference it with Clear Outside. https://play.google.com/store/apps/details?id=com.windyty.android&hl=en_GB
I use a few apps for my astrophotography and you can find a
blog post here: https://undersouthwestskies.blogspot.com/2025/02/my-beginners-guide-to-useful-apps-for.html
Finding a dark sky site
Light pollution impacts your milky way photography! Well, it
does in my area! On the other hand with a south facing coastline that looks out
over the English Channel, I am blessed – no large cities between me and the
Milky Way over the horizon!

_(flipped_left-right).jpg)
Darksitefinder.com - https://darksitefinder.com/map/ - Use Bortle scale colouring on maps to show light pollution above you in your
area. The higher the number, the worst the pollution. Another site is
lightpollutionmap.info. Remember, the
categories in your area are approximate for the skies above.
You can find out more about the Bortle classes here: https://skyandtelescope.org/astronomy-resources/light-pollution-and-astronomy-the-bortle-dark-sky-scale/ and https://en.wikipedia.org/wiki/Bortle_scale
Scouting a location during daytime
This is really an important part of your milky way
astrophotography planning. Not just for scoping out potential foreground
interest objects, but also just purely from a safety viewpoint. On a moonless
night in a remote dark sky location – stumbling around in the dark is
ill-advised! Its also nigh on impossible to find an interesting foreground composition
– because you can barely see the foreground details – its dark! And switching
on your white light torch destroys that hard won dark sky eye adaptation you
have built up since leaving the car!

Using augmented reality in PhotoPills plus the planner tool
allows me to go in advance to south coast destinations and plan my shots. I can
hunt around for interesting foreground compositions (more on that in a later
post) and work out where the milky way will be in such a composition. I have literally spent the last two months
walking the coast trying to find some interesting spots for this forthcoming
2025 milky way season. They are listed in my notebook – shots to aim for! I actually take a smartphone photo of my
selected shooting location as well – the possible view and, sadly I must admit,
one of the actual spot where I propose placing a tripod. That sounds so…..anal…..doesn’t
it! I work out walking routes, car parking spots, nearest pub to call in at. I
try to find spots where I can find some shelter from our prevailing south
westerly winds – it’s not a priority but I’ll take an opportunity for some
natural shelter if I can find it. If I’m
on a beach – I search for alternative escape routes as well, just in case! All
those years on mountain walking and fieldwork trips and expeditions. A safety-first
approach, honed! I tend to stand for
most of the night at a location unless it is deep sky astrophotography from
behind the car, in which case I sit just inside my boot space – out of the
wind. So, if I can find a sheltered spot where I can sit on my folding mat for
a few minutes to give my legs a rest, all the better.


Down my way, shooting from along the cliff tops, is a frequent
thing. So, day time scouting the cliff routes, the drops, the wind funnel areas
– its critical! I don’t want to be calling out colleagues I know who work in
our local coastguard cliff rescue teams on a cold summer night because I
stupidly took a step backwards and fell off a cliff! Be sensible – do your day
time scouting – for safety purposes as well as for seeking out great foreground
composition opportunities.
One final tip – I often do an image search on the internet
and in the various Milky way Facebook groups I am in to find what local
photographers in my area have done as compositions. I’m not looking to
necessarily do the same as them but it is a useful source of inspiration and
information – what settings did they use? What was their foreground composition?
So, a quick search St Michael’s Mount and Milky Way, for example, gives me
plenty of ideas!

Hope this has helped and enthused you to do some milky way
photography. By getting familiar with the planning tool apps early on and
scouting out potential shooting locations, it will help you better understand
what comes next in my blog series - What base astro settings can we use
to help us get milky way image success?
In the meantime, if I have anything wrong, drop me a comment and let me know and I will get it corrected immediately.
PS - it would be easy to say "You haven't made much progress last year on your milky way photography, have you Steve?"
A fair legitimate point. However, the images below were the very first ones I took of the Milky Way, at the start of last year and end of the year before that. Compare them with the ones above and in previous posts - there is some progress - isn't there? 😧😆


.jpg)


No comments:
Post a Comment
Hello, thanks for visiting us. If you want to drop a comment or get in touch - leave a comment and we will get back to you asap. Bye