Newly arrived to my blog? Want to know more about me before you dive into my posts? Why not visit the home page first and start your exploration from there:
https://undersouthwestskies.blogspot.com/2025/01/welcome-to-my-new-astronomyastrophotogr.html
And welcome.
Welcome to 'UnderSouthWest Skies'. Thanks for stopping by. I hope you find the experience worthwhile. This blog post has been written from my own 'beginner perspective' after doing lots of reading on various basic astronomy and astrophotography topics of interest to beginners. In getting my head around it all, I may have got odd bits slightly wrong; but, like you, I am on a leaning journey, so please forgive any unintentional errors. Also, just because I have gone down a particular road regarding equipment, it doesn't mean that I have chosen the 'CORRECT' route!
Meanwhile, clear skies to you. Take care and thanks for visiting Steve aka PlymouthAstroBoy

A few months ago I took the plunge and dived into autoguiding!
Let me remind you - this is my current astrophotography kit
- Canon 800D (which is about to be astro-modified)
- Samyang 135 and 14mm lenses at F/2
- Canon 22 and 50mm prime lenses at F/2.8
- SkyWatcher Star Adventurer 2i
- Ioptron skytracker
- Optolong L-Pro filter
- ASIair mini
- ZWO 120mm mini guide cam
- RVO 32mm Guide scope

A . Setting up mount and Polar Aligning
1.
Focus main dslr camera on polaris to focus
lens/WO ZS 61ii – use bahtinov mask
2.
Rough Polar align tracker – level tripod – polar line MANUALLY (tracker
off)
3.
Balance the rig as usual - green dovetail as low as poss;
CW higher up bar near centre of rotation
4. Switch star tracker on to app – do test shots on different
targets – ensure tracker working and balanced – reset app to 0 or 999 photos after; then switch
tracker off
5.
Connect cables to Asiair (0C temp – then bubble wrap ASIair as per manual instructions)
6. Power up ASIair and focus guidescope/ camera – load app on phone; on app first page – leave main camera FL at 0
7. To focus guide scope/cam - on main camera and guide camera menus - switch off both cameras in the app. Then on main camera tab - select guide cam as the main camera. Do test shots and focus guide scope manually using focusing rings. Do test shots - when focused - switch back to main camera tab at top and re-select the DSLR as main camera. Go back into Guide camera tab and re-select the 120mm mini as guide cam. Select guide speed x0.5 in settings.
8. On main app page - check plate solving works – annotate to see DSO target; switch on cross hairs
9. Try PA immediately with ASIair on and star tracker mount off
a.
AA on/tracker off
b. select PA in main screen of app and follow instructions. Aiming for less than 20” smiley face; slew 60 degrees. Preview. Give time for settling vibrations; Take test shot. Adjust until PA is accurate and smiley face gained. use 3" exposures. Increase to 10" if necessary. Refresh and keep adjusting RA and DEC until very close to target co-ordinates. Adjust RA first. Remember to tap synch mount button at end.
c. Now switch on mount tracker
d.
IF PA FAILS – go to preview – view
an image – check what issue is
10.
Alternative PA – turn off mount
– cancel warning screen – move scope manually. When PA finished – power off
mount; power of AA mini. Power mount back on followed by AA mini. Finish by
manually turning mount switch back on.
11.
Finish by slewing to DSO – do plate solve
below

B. start the autoguiding
focus/calibration
1. tap guiding on LH menu on home page of app to bring up graph.
2. Make sure that rig is swung outwards - always calibrate on target near celestial equator target
3. Clear
calibration tab – top right corner graph
3. Double
tap graph – guiding screen comes up – check DEC IS OFF; RA
aggr set to 55 - 70% in first instance; DEC set to 100% ; (Confirm under the mount tab at top that mount settings ensure guiding rate =
x.0.5; try RA aggr at 55% first – aiming to get RMS figures <1.0. If >1.0
= focusing issue on guide cam start again!
4. Tap looping arrows symbol RH menu - 3”
exposure zenith 2”(gain 60 – 70) (can
take 5 to 10 mins for calibration) if stars too
bright reduce gain
5. Tap
on a star to select - may automatically select a star for me – mid range brightness and size
6. Tap
cross hairs RH menu to start calibration – Should move guide camera around 25
pixels (px). First west/then east – optimally 5 – 8 steps.
7. By the time reach 10 - 15 steps west, the box should be off the star and then moving back towards it; it clears backlash on the east on its way back and should end up centred in the green box at end.
8.
Watch guiding graph – blue RA line should be between +/- 4” - allow graph to run for 40” to calm down. Aiming for RMS ,1.0 and RA 0.5 ish
9. Determine maximum shutter speed when guiding for main camera image; Adjust ISO and interval etc to check image
10.
Tips - Aim for star peak of 80 – 200 for proper lock on. If
number of steps <4 – calibration = poor
- adjust calibration to smaller number . If number of steps too
many – ASIair wont reach 25 px in reasonable time – time out message – adjust
calibration step to larger number - try
5000 – 8000 initially. Other settings try 2000 or 2500. Should take around 10 – 20 steps max. If
imaging towards zenith – increase calibration step. If dec red line jumps off graph – poor
polar alignment – redo. Aiming for +/- 4 on RA line. If graph jumpy –
decrease RA aggressiveness in guiding tab
12.
If calibration fails tips – tracker on and working? All cables in
correctly? No cables snagging? Not pointing at Polaris? Dec mode – off?
13.
To touch camera for any reason – stop guiding - clear graph after; tap looping again to
start - DON’t redo calibration

C. set up auto run/main camera
settings
1. Select auto run page and then tap three lines/dots icon. Set up shooting plan - regarding exposure length , interval and number of shots. Do test shots on DSO in auto run – do not touch
camera if not done above - first delay
15” – interval 3” – set up for 1 image only; put in target
2. When image appears on screen – zoom in and check no star trailing – if
unclear STOP GUIDING - go back and refocus main
camera with bahtinov mask and then restart guiding and do test images in
preview. Star trailing lower exposure length and test again
3. Now having completed test shots - set up auto run details for night - fill in target etc
5.
Watch the graph – watch RMS values
on RA and check guiding accuracy
6. Tips
- DO EXPOSURES IN 20 – 30 MIN BLOCKS . At
end – repeat main camera focusing procedure – preview – test shots x 3” – zoom
in on screen and check sharpness and adjust main lens focus accordingly . Repeat
autoguider refocusing procedure. Adjust for temperatures changes


Problem solving on the night: If getting trailing or inaccurate guiding, initially check
1. all settings are switched on in app - e.g. main cam, mount and guide cam
2. correct focal lengths entered in various tabs
3. focus is absolute on both cameras
4.
settings in app not interfering
5. cables are not snagging anywhere around mount
6. Mount is is powered and working. Ditto with ASIair mini
7. Internet signal still established between app and ASIair mini
NOTES:
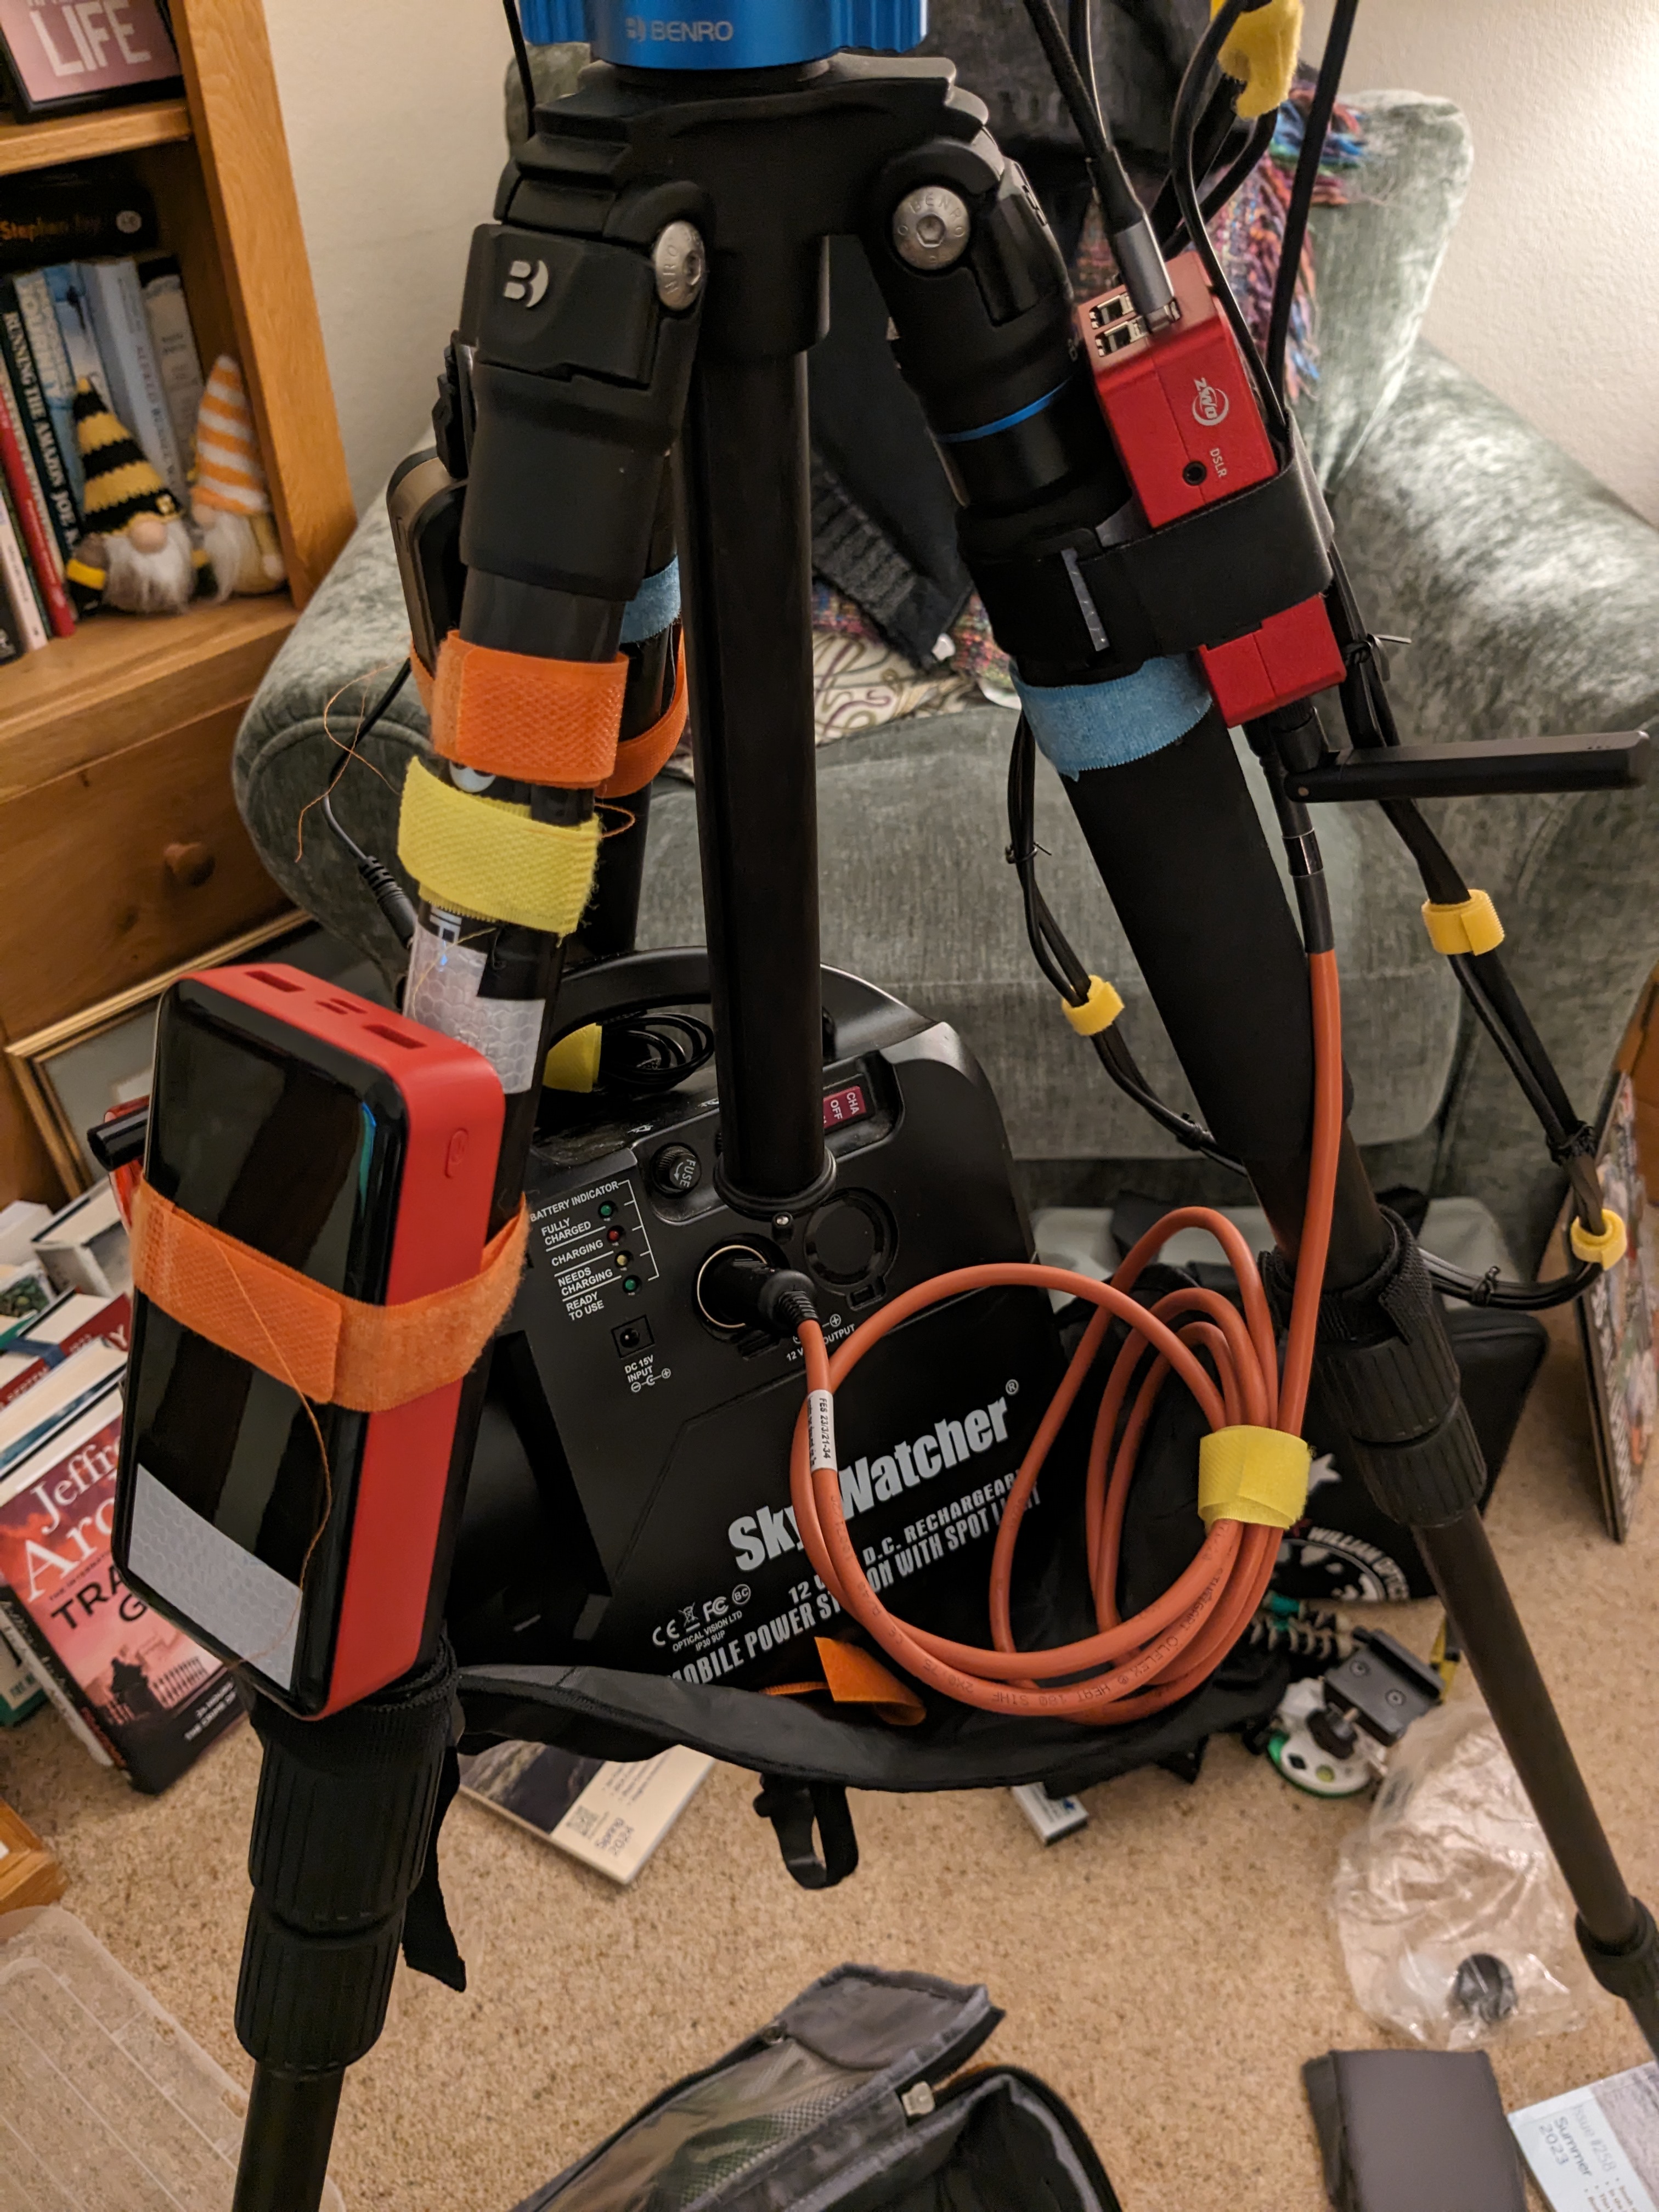
Connecting equipment together
1. From back of ZWO 120mm mini guide camera – usb cable to ASIair mini usb slot;

2. ST4 cable from guide cam to SWSA
2i tracker
3.
From
Canon 800D dslr – cable from usb port to ASIair mini usb slot
4. To ASIair mini – 12v cable from power tank;

5. USB storage drive into spare USB slot on ASIair mini
6. From separate power banks on tripod legs – (a) dummy battery usb cable from canon 800 dslr to one power pack (b) Dew heater bands for guide scope and lenses or zenithstar 61ii to second power pack
7.
Attach ASIair mini to tripod to reduce weight on star tracker – ensure all cables will
rotate freely with tracker

No comments:
Post a Comment
Hello, thanks for visiting us. If you want to drop a comment or get in touch - leave a comment and we will get back to you asap. Bye