Home page: welcome - who am I - blog aims - blog navigation tips

Thursday, 13 March 2025

Editing tutorial: Trying to learn the techniques of blending two images to form a composite in affinity photo


Blogger isn't always the most intuitive platform to navigate - but it is free and simple to use and manage. 

To help you find information quickly on this blog, you can


Now here is the thing. 

I can capture astrophotography data on the night. I'm getting better at working out the exposure triangle settings and checking my histogram on the night. Likewise with using my tracker and gaining sets of lights, flats, darks and bias frames. 

Beginning to understand taking landscape shots in blue and twilight hours. Lousy on landscape composition of foreground however. Loads to sort out there. 

My real difficulties though, and please don't ask me "why?" because I don't know, is understanding how to merge two images into one in affinity photo. You know - putting a foreground with a sky shot. It seems so easy on the YouTube tutorials and yet whenever I try - a disaster. 

Anyway, here is my first efforts. And yes, I know the sky is completely wrong proportion etc - but its just a practice image - trying to learn how to replace a sky in a shot; how to select an object from another image and place it into another.

I really find selections, masking and layers control really difficult to assimilate and I just don't understand why! 


Which of the two images is the least worse? got any tips on how I can improve them? Drop me a comment below - all help appreciated - especially if you are an affinity photo user. 


Sunday, 9 March 2025

Equipment: An equipment check list for a milky way astrophotography session

 Blogger isn't always the most intuitive platform to navigate - but it is free and simple to use and manage. 

To help you find information quickly on this blog, you can


As I get older, I get more absent minded and forgetful. I've lost the car a few times in various car parks. I've left the phone on the car roof and lost it! I once left my GoPro camera recording a night session and had to drive back and get it. Fortunately it was still dark, deserted and the GoPro was attached to a fence post and not immediately noticeable.

My real pet hates are when I forget to pack something I need. Last time I left the powertank behind and had to drive twenty minutes home to get it - having assembled the rig earlier only to discover that...... you get the picture. 

I've done something similar with the tripod as well! 

So, I use check lists. There are a few posts here showing my various checklists. It is a system which seems to have helped me enormously when I was dinghy cruising and expeditioning. 

So, without further ado, here is my milky way night session check list. Hope you find it useful. If I have missed off anything, drop me a comment below and I will add it in for all. 

Clear skies, take care, stay safe and have fun out there 

Steve 


And just in case you cant get the picture printed off - here it is in text below 

SWSA 2i gear


Text Box: Copyright: PlymouthAstroBoy
www.UnderSouthWestSkies.blogspot.comGeneral equipment  - safety

Tracker and base


Headtorch+ spare

WO base wedge+plastic shims


Penknife

Counterweight assembly+bar+one weight


Garmin InReach PLB

AA batteries


Charged smartphone

Large flat dovetail clamp


First Aid kit

Round dovetail clamp


Space blankets + Bivvy bags

MSM Z base


Hand warmers

Gorillapod joby ball head


Compass + Map

Polar scope illuminator


Driving and reading glasses

Camera connect cable


Insect spray

Green base plate


Fleece blanket

Right angled polar scope viewer


2 emergency red glow sticks

Kneeling mat


(Small bothy) (small beach shelter)

Benbo CF tripod


Clothing

Green laser adapter+pen


Waterproof

Camera Gear


Duvet coat

Canon 800D+dummy battery


Thermals

Lenses – Samyang 14mm, Canon 22mm+50mm


Hats and gloves – fingerless and over-gloves

GoPro Hero 9+batteries + tips book


Beanie/buff

Canon batteries -spares


Walking boots and thick socks

Cleaning kit + small tripod screw adapter thread


Whit flats ring + Bahtinov masks


Intervalometer + AAA batteries


Other

L bracket


Hot drinks/hot water

Dew band


Teabags/food/snacks

Small Joby Gorillapod tripod


(Trangia, fuel, matches)

Optolong L Pro + other filters


(Lightweight camping chair)

Spare memory cards


(camping mat, lightweight tent, sleeping bag)

Log/note book  + Pen


Reading book

Small handheld diffuse glow lamp


Samsung tablet for flats


Power


3 x power banks


Velcro cable ties - spares

Usb cables – C, micro and A


Small roll electrical and/or duct tape

Spare C2032/2025 disc batteries


Small masking tape strips card

Spare AA and AAA batteries


Small screwdriver/hex key tool kit


Car keys , wallet


Left emergency plan – location, routes, times


Saturday, 8 March 2025

Equipment - Making a DIY right angled viewfinder for a star tracker polar scope

Blogger isn't always the most intuitive platform to navigate - but it is free and simple to use and manage. 

To help you find information quickly on this blog, you can


Finally, I have got around to making a right angled polar scope viewfinder. The cost of them is around £80 mark with postage, here in the UK. I had an old pentax DSLR right angled view finder and I was sure I could 'adapt' it. Now there is an issue in that this old one mirror flips everything horizontally....but more of that little quirk later in the post. 

I've wanted one of these right angled viewers for quite some time. I find it increasingly difficult to bend down and look up through the central polar scope of my skywatcher star adventurer tracker (same for my Ioptron sky tracker as well).  There isn't an astrophotographer alive who uses a star tracker who doesn't understand this issue. Here at a latitude of 50N - the tilt of the tracker is such that when the polar scope is inserted, you are on your knees with your back arched to look up through it. If you can do that! When I'm on my knees below it, my eye is around 14" away from the viewfinder - rendering it useless! If I try to get underneath it and closer, I invariably end up knocking the tripod and then struggling to get back off my knees - very frustrating! 

When doing DSO astrophotography and using my ASIair mini - then there is no problem if I am slightly out in the initial polar alignment as the ASIair helps me correct it quickly. But when doing milky way astrophotography - then a right angled viewing gizmo is going to be very helpful indeed. 

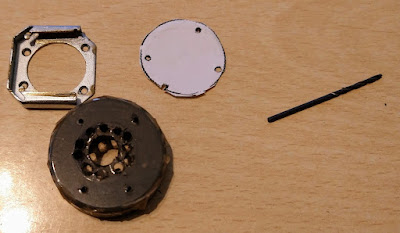
So what stuff did I use?

  • an old pentax right angled DSLR viewer
  • electrical tape
  • an old polar scope cover piece I had knocking about
  • some very tiny phillips screws 
(I should at this point just explain for those not in the know, that a polar scope is essential to getting good alignment with the stars so that the camera tracks their movement above and trailing stars is avoided. This involves aligning the tracker with the north star Polaris. The bigger the lens you use, the more accurate you have to be in your alignment processes - otherwise you will have horrible trailing and photos that cannot be stacked together in any available software.)


I removed the metal silver viewfinder frame off my ebay purchase by undoing the four tiny screws and then took the protective cover lid off the polar scope. Using the silver viewfinder slot as a template I then marked out drill holes and also a central large hole to be cut out.


Ten minutes judicious use of my multi-tool with drill and then sander bits and hey presto - the protective lid had been cut out. It was then just a matter of screwing the lid back onto the DSLR viewfinder and then doing a few trial fits. 


It proved to be a little loose but a thin strip of duct tape on half of the lid lip - turned it to a fairly snug push-on fit. 

Does it work?  OF COURSE IT DOES! 😁
I have genuinely surprised myself - no more wet knees, cricked neck or wrecked back muscles. 


And it works on the star adventurer too.

So what about the flipping issue? 

Ok, how best to describe this? For some reason, the right angled viewer mirror flips the view of the polar scope reticules. So, 3 o'clock is at the 9 o'clock position and obviously, 9 o'clock switches over to the 3 o'clock position.

What does this mean in reality? Well when positioning Polaris on the correct place in the inner circle of the reticule using a polar alignment app to help determine its position - if Polaris is shown at the 5 o'clock position on the app, on my reticule, when using the polar scope, it will have to be placed at the 7 o'clock position instead.  It takes a minute or two to get your head around it - think mirror flip of the reticule along the vertical axis. 

It may sound confusing but in reality is quick and simple to work out; as long as I remember!! 

I spent around £2 in all instead of £80 so I am happy and I have reused/recycled something to boot. 

With plastic 3D printers etc - I am sure there is a free template for making the bit which fixes a viewfinder to the polar scope on the tracker. 

I found this Sky at night article which gives a better overview on how to do it than I have above